Produces a textual representation of the data in an integer array. It efficentely and compactly counts the occurences of each value, converts it to a percentage and dispays it graphically.
Terms of Agreement:
By using this code, you agree to the following terms...
1) You may use this code in your own programs (and may compile it into a program and distribute it in compiled format for languages that allow it) freely and with no charge.
2) You MAY NOT redistribute this code (for example to a web site) without written permission from the original author. Failure to do so is a violation of copyright laws.
3) You may link to this code from another website, but ONLY if it is not wrapped in a frame.
4) You will abide by any additional copyright restrictions which the author may have placed in the code or code's description.
//**************************************
//
// Name: Draws Textual Histogram / BarGr
// aph from an Integer Array
// Description:Produces a textual repres
// entation of the data in an integer array
// . It efficentely and compactly counts th
// e occurences of each value, converts it
// to a percentage and dispays it graphical
// ly.
// By: Zach Bastick
//
// Inputs:An integer array (e.g. int[],
// or ArrayList), the minimu
// m value in array and the maximum value i
// n the array (for graphing purposes).
//
// Returns:An illustration similar to th
// is:
1.36% 10 |xx
3.52% 9 |xxxx
3.27% 8 |xxxx
8.12% 7 |xxxxxxxxx
10.91% 6 |xxxxxxxxxxx
13.12% 5 |xxxxxxxxxxxxxx
14.6% 4 |xxxxxxxxxxxxxxx
14.69% 3 |xxxxxxxxxxxxxxx
12.74% 2 |xxxxxxxxxxxxx
10.62% 1 |xxxxxxxxxxx
6.98% 0 |xxxxxxx
total: 11776
//
//This code is copyrighted and has// limited warranties.Please see http://
// www.Planet-Source-Code.com/vb/scripts/Sh
// owCode.asp?txtCodeId=4915&lngWId=2//for details.//**************************************
//
public void listDistribution(ArrayList list, int minValue, int maxValue){
int[] count = new int[maxValue-minValue+1];
float[] percentage = new float[maxValue-minValue+1];
for(int i=0; i count[i]=0;
for(int i=0; i count[list.get(i)-minValue]++;
for(int i=0; i percentage[i] = ((count[i]/(float)list.size())*100);
for(int i=maxValue; i>=minValue; i--){ //display
System.out.print(((int)(percentage[i]*100))/(float)100+"%\t"+i+"\t|");
for(int j=0; j System.out.print("x");
System.out.print("\n");
}
System.out.println("total: "+list.size());
}
original posted in http://www.planetsourcecode.com
How to declare a file The first thing you need to know about files is how to declare them in pascal. A file is declared similarly to any other variable like so...
var <> : file of <> ...
The type in the declaration will by any of the predefined types or one of your types that you have defined in the type section. The most common type to use is a record which you have declared. This means that the file will store records of that type. e.g. You could have a file containing entries of type person which would have attributes like name, address, phone etc..
Assign This is where you give the file variable that you have declared an associated file name. It works like so:--
assign (,);.
Now your file variable points to a real file on the drive. This is where all the information will be written to. Now you must open your file. Two ways of opening a file are explained below.
Rewrite If the file name you have assigned to your file variable does not actually exist on disk then Rewrite will create it for you. What rewrite does, is clear the file so you can write to it. NOTE: You are not able to read from the file when using rewrite. Rewrite is used like this:--
rewrite (); Easy! Now you can write to the file.
Reset This is a mode where you can both read and write to the file. This is the main mode that you should use in your programs. Sometimes a trick if you want to create a file and have it open for reading and writing is to create the file with rewrite and then use reset on the file. Reset works like so:--
reset ();
Close The close command closes a file. (as if you hadn't guessed). You need to do this at the end of your program because it saves the changes to the file. To close a file you write :--
close ();
Writing records to a file Writing records to a file is VERY easy. For the examples coming up we will be using the following record type.
type
personType = record name : string[30];
address : string[60];
phone : string[7];
end;
Now lets say that you have taken input from the user and have all of the values of a person variable. Now you want to write it to the file right? To do this you use the write statement. You should notice that this is the same command that is used for writing to the screen. Well, writing to a file is not much different. All you need to do is the following...
write (,person); You can write as many records to the file as you like now :)
Reading records from a file To read records from a file you need to use the read statement. This is how you do it:--
read (,person); This reads from the file into your record. When you next execute this statement you will read the next record from the file into your record variable. This is because once you have done a read statement the file pointer is moved along to the next record in the file for your convenience. :)
Seek The seek command is to go to a certain record in the file. The file starts at 0 so to be at the first record you need to go
seek (,0).
To be past the last record at a place where you can add records to the end of the file you will need to go...
seek (,filesize()); In the above example filesize returns the number of records in the file. But since the records are number from zero up, the seek command goes to the next record after the last record entered, ie the end of the file.
Truncate The truncate command deletes all the records in the file that lie after the current file position. So to delete the last record from the file you will have to go...
seek (,filesize()-1); truncate ();
Deleting a record from a file The simplest way to do this is to go to the last record in the file, read that record into a variable, then go to the record you want to delete and over-write this with the variable that contains the last record's information. Once you have done this you go back to the last record and use truncate to remove it from the end. Now you have deleted a file. The example program below contains a delete procedure if you want to see this in code.
program Example;
uses Crt;
type
personType = record name : string[30];
address : string[60];
phone : string[7];
end;
var personFile : file of person;
procedure Openfile;
begin
assign (personFile,'person.dat');
reset (personFile); {This assumes the file already exists}
end;
procedure writeToFile;
var person : personType;
begin
with person do begin write ('NAME: '); readln(name);
write ('ADDRESS: '); readln(address);
write ('PHONE: '); readln (phone);
end;
write (personFile,person);
end;
procedure readFromFile;
var person : personType;
begin
while not eof(personFile) do begin clrscr; read (personFile,person);
with person do begin writeln ('NAME: ',name);
writeln ('ADDRESS: ',address);
writeln ('PHONE: ',phone);
end;
readKey; {waits for a key to be pressed}
end;
end;
procedure deleteRecord;
var i : integer;
person : personType;
begin
write ('What record number would you like to delete? ');
readln (i);
seek (personFile,i);
if eof(personFile) then exit;
{The above line checks if 'i' is bigger than or equal to the file size}
{After all, you can't delete a record that doesn't exist!}
As you probably know, nearly all computer programs take input from the user.
If you don't know how to take input then you won't get very far in the programming world.
Pascal has two major functions for taking input from the user. These are:-
read
Syntax:
read (variable);
Explanation: This reads all the characters typed, until the user presses enter, into the variable.
If the variable is of type integer, and the user types in string characters, then
an error will occur. If the variable is a string of defined length then read will only
take the first X characters from the line and put them into the string, where X is the size
of the string. Read does not move the cursor to the next line after input.
readln
Syntax: readln (variable);
Explanation: This is exactly the same as read except for the fact that it moves the cursor to the next line after the user presses enter.
The output commands in pascal are very similar in syntax to the input commands.
Explanation: The write command displays a string of characters on the screen. When a field width is included, the writing
is right aligned within the field width e.g. write ('Hello':10); will produce the following output...
00000Hello
(0=space)
Notice that 'Hello' is right-aligned within the field of ten characters , the remaining spaces coming before 'Hello'
When writing real numbers, you must specify the field width and number of decimal places displayed, otherwise pascal will write it to the screen in standard form (this is not good). A field width of zero will just write the real as if you had not specified a field width.
If you want to write a combination of things, separate these by a comma. e.g.
write ('Hello ' , name , ', you weigh ' , weight:0:2 , ' kg.'); The above will write something like this... Hello Joe Bob, you weigh 76.54 kg.
Note: The write command does not move the cursor to the next line after execution.
Explanation: The writeln command is exactly the same as the write command except for the fact that it moves the cursor
to the next line after execution.
NOTE: All of the above commands are also used when reading and writing to files. This will be covered later.
EXAMPLE PROGRAM
Program example; {This is an example program for input and output}
uses Crt;
var
name : string[30];
begin
clrscr; {This clears the screen} write ('What is your name? '); {Writes the question without moveing the cursor to the next line} readln (name); {take input from user}
writeln ('Hello ', name); {Output Hello joebob}
while not keypressed do; {waits for a key to be pressed}
end.
Arrays
Arrays are an important part of Pascal. You can think of them like a catalogue of information. Arrays are declared under the type section. They are a collection of a number of variables, arranged in the form of a table.
type
integerArray = array[1..30] of integer;
integerTable = array[1..25,1..25] of integer;
stringArray = array[1..100] of string[15];
.....
This is an example of declaring an array in the type block. The array called 'integerArray' is like a list of integers, if seen on paper it might look like this...
The array called integerTable can be represented by a table. It is a two dimensional array. You can have three,four or even five dimensions in an array if you want.
Accessing Arrays
To access an entry of an array during the program you must go...arrayname[entrynumber] or to access a multi-dimensional array you go...arrayname[x,y,z] (3d array)
OK HERE COMES AN EXAMPLE PROGRAM
Program classTest; {An example program demostration arrays} {Takes scores from a class test and tells people if they passed or not}
uses Crt;
type
testScores = array[1..10] of integer;
var
i : integer;
marks : testScores;
passOrFail : string[6];
begin
clrscr;
for i := 1 to 10 do begin write ('Please enter test score number ',i,': ');
readln(marks[i]);
end;
for i := 1 to 10 do begin if (marks[i] <>else
passOrFail := 'Passed';
writeln ('Student no.',i,' ',passOrFail);
end;
while not keypressed do;
end.
Arrays can also be declared in the variables section without making a type. However it is better to use a type if you plan to use the same type of array in multiple places. So this code in the last program...
type
testScores = array[1..10] of integer;
var
marks : testScores;
Can also be written like this:
var
marks : array[1..10] of integer;
This would do exactly the same thing, but does not declare a type of 'testScores'.
Mathematical
Operations
Pascal can do many mathematical operations. They are all relatively simple and easy to remember.
The first thing to remember is that pascal uses := not = to assign a value to a variable.
e.g. int := 3;
Basic mathematical operators
Addition ...................... x := y + z; Subtraction ................... x := y - z; Multiplication ................ x := y * z; Division ...................... x := y / z; Integer division .............. x := y div z; Modulo arithmetic ............. x := y mod z;
Integer Division: One integer is divided by another and the integer part of the result is returned.
Modulo Arithmetic (Remainder Arithmetic): x := y mod z; The above finds the remainder of y/z and puts it into x.
These mathematical operations are pretty self explanatory.
Mathematical functions
SQR
Syntax:
SQR(Real Variable)
Explanation: SQR returns the square of the real variable that is passed to it, pretty simple really.
Example: x := SQR(y);
This finds the square of y and puts the result in x.
SQRT
Syntax:
SQRT(Real Variable)
Explanation: SQRT returns the square root of the real variable that is passed to it, pretty simple really.
Example: x := SQRT(y);
This finds the square root of y and puts the result in x.
SIN
Syntax:
SIN(Real variable)
Explantation: SIN returns the sin of the number that is passed to it. Unfortunately this is in radians(stupid radians).
2*pi radians is equal to 360 degrees, so to convert from degrees to radians it is degrees/180 * pi,
and from radians to degrees it is radians/pi * 180. It is a bit of a hassle but nevermind.
Example: x := SIN(y);
This finds the sin of y(radians) and puts the value in x.
COS
Syntax:
COS(Real variable)
Explantation: COS returns the cos of the number that is passed to it. This is also in radians. If you want to know how to convert
radians into degrees and vice-versa then read the explanation of SIN.
Example: x := COS(y);
This finds the cos of y(radians) and puts the value in x.
ARCTAN
Syntax:
ARCTAN(Real variable)
Explantation: ARCTAN returns the inverse tanget of the number that is passed to it.
It returns the angle in radians (gasp).
Example: x := ARCTAN(y); This finds the inverse tangent, in radians, of y and puts the value in x.
Finding TANGENT
To find tanget just divide sin(Y) by cos(Y).
e.gx := sin(y)/cos(y); finds the tangent of y and puts it in x (remember radians).
Finding INVERSE SIN/COS
To find INVERSE SIN or INVERSE COS do the following...
INVERSE SIN = ARCTAN(y/sqrt(1-sqr(y)))
INVERSE COS = ARCTAN(sqrt(1-sqr(x))/x)
Sox := arctan(y/sqrt(1-sqr(y))); finds the inverse sin of y and puts it in x.
Sox := arctan(sqrt(1-sqr(x))/x); finds the inverse cos of y and puts it in x.
Loops
Okay, this lesson you are going to learn about loops. There are two main types of loop in Turbo Pascal. While loops and For loops.
While
While loops take the form :
whiledo begin statement block end;
These are useful for things like waiting until the user presses a key or waiting until a number entered by the user is valid.
For instance you might say :
var valueIn : String; {This will be the value the user enters} I, code : Integer; begin valueIn := 'abc'; {Fill it with a non integer value} code := 1; while code <> 0 do {While code is zero do the following} begin writeln('Enter a number:'); readln(valueIn); val(valueIn, I, code); {Move the integer value of valueIn to I or if it isn't an} {integer then code will be something other than 0. NB: code is} {the error code. I can only hold integers so there is an error} {raised when the string can't be converted to an integer} end; end.
In this loop as long as condition is true (in this case code <> 0) it will execute the code between the begin and the corresponding end. You can miss out the begin and end but then you will only be able to have one line of code, or even no lines of code at all if you want.
eg: while not keypressed do;
In the above example as long as there is not a key pressed the instructions in the loop are executed. Since there are no instructions in the loop this stops the program until the user presses a key.
The 'For' Loop
This loop takes the form:
forvariable := value1 [to|downto] value2do begin statement block end;
For loops are more useful for iterating through an array. For instance you might want to add 1 to each integer in an array...
var i : Integer; {This will be the counter for the loop} myArray : array[1..30] of Integer; {See arrays for this} begin for i := 1 to 30 do myArray[i] := myArray[i] + 1; end.
This does goes through each item in the array 'MyArray' and adds one to the current value in it.
Repeat
The repeat loop is very similar to the while loop except the condition is at the end, and if you want to execute multiple lines, then you don't need to put begin .. end keywords around the multiple lines. For instance, this loop using while...
i := 1; while i <= 6 do begin
writeln(i);
i := i + 1;
end;
Would be like this with a repeat loop...
i := 1; repeat begin
writeln(i);
i := i + 1;
until i > 6;
Notice how the condition has changed slightly. For the while loop, it would do the loop while the condition is true, whereas the repeat loop does it until the condition is true. (Or while the condition is false).
Flow Control
Flow control is basically changing what your program does depending on the circumstances. In pascal there is the if statement which is used like so:
and this can go on for a long time. For instance you could have a condition:
if (i = 1) and (j <= 3) or not (k <> 0) then statement block
Note : (not k <> 0) is the same as (k = 0).
Now here is an example program:
program security;
uses crt;
var input : String;
begin clrscr;
writeln('Enter the password');
readln(input);
if (input = 'Pascal') then writeln('Pascal is easy!')
{Note no semicolon for one line} else if (input = 'Basic') then begin writeln('Basic is not');
writeln('very hard!');
end else writeln('Wrong password!');
end.
This first prompts the user to enter a password and then reads that into intput. First it checks to see if input is 'Pascal'. Note that this is case sensitive. If it is 'Pascal' then it writes 'Pascal is easy!' and goes to the end of the if statement (which happens to be the end of the program) otherwise it checks the next condition. Is it 'Basic'? if it is then write 'Basic is not very hard!' (over two lines).If it is not then try the next condition. The next condition is ELSE. The code in the ELSE part of the if statement is executed if none of the other conditions in the if statement are met.
Another flow control command, which is actually considered bad practice to use, but is quite useful in some situations is goto. To use this declare a label in the label section and use it in your code. Then just say : goto label;
eg:
label label1;
begin .
.
.
label1:
{Note the colon!}
.
.
.
goto label1;
{Note no colon}
.
.
.
end.
Easy!
You might have noticed that sometimes the if statement may get a little cumbersome to use. ie:
if i = 0 then
...
else if i = 1 then
...
else if i = 2 then
And so on. This is really cumbersome and annoying (you have to type the same thing over and over). So what you want to use is the case statement. The above example would be done like so:
case i of
0:...
1:...
2:...
3:...
4:...
5:...
6:...
end;
Very handy. If you want to have multiple lines of code for one of the options, then you must put the multiple lines between begin and end. If you try to use the case statement with a String type (or any type that isn't a char or integer) then Pascal will give you an error. You can only use ordinal types with the case statment.
Another useful set of commands are the 'EXIT' commands. These are:
Halt
This does the simple task of ending your program.
Exit
This command exits from the current procedure/function.
Break
This command exits from the current loop.
Records
You may find that sometimes there are a lot of variables that are related to each other in some way. For instance you might find that you have a door and know its height, width etc. and want to keep them all together.
This sounds like a job for : records
Records are just a way of defining your own type. It is done like this:
type doorType = record width : Integer; height : Integer; color : String[10]; end;
Now when you want to use doorType in your program you would do this:
var aDoor : doorType; begin
with aDoor do begin width := 30;
height := 50;
color := 'Blue';
end;
end.
It's that easy! You may notice I have used the with statement. What this means is that you don't have to prefix each of the fields with the variable. So you can see that it can save you quite a bit of work.
So here's my sample program for finding the area of a door.
program doorFind; {Find the area of a door}
uses crt;
type doorType = record width : Integer;
height : Integer;
end;
var door : doorType;
begin clrscr;
writeln('Enter the door height');
readln(door.height);
writeln('Enter the door width');
readln(door.width);
writeln('The door area is ', door.width*door.height);
readln;
end.
Procedures and Functions
Sometimes when you are programming you might need to use the same piece of code over and over again. It would make your program messy if you did this, so code that you want to use multiple times is put in a procedure or a function.
The difference between a function and a procedure is that a function returns a value whereas a procedure does not. So if your program has multiple Yes/No questions then you might want to make a function which returns Yes or No to any question.
Procedures and Functions both take parameters. These are values that the procedure is passed when it is called. An example of this would be...
... drawBob (x,y); ...
This would call the procedure drawBob. It passes it the values x and y which the procedure will use as Bob's coordinates. The drawBob procedure would look something like this...
procedure drawBob (x,y : integer); beginend.
Somewhere in the code it would use x and y. Notice that x and y are declared like variables except for the fact that they are in the procedure's header. If you wanted different types of parameters, eg. integers and strings, then you must separate them by semi-colons like this...
procedure doSomething (x,y : integer; name : string); var begin end.
There might be a situation where you want the procedure to modify the values passed to it. Normally if you did this in the procedures it modifies the parameters but it does not modify the variables that the parameter's values were given from. Anyway if you want to do this you need to put var in front of the parameters. So if you wanted to do something which changed x and y you would make a procedure like so...
procedure modifyXY (var x,y:integer); begin end.
So by now you should know how to use a procedure. Next we will talk about Functions.
A function is like a procedure except it returns a value. You could also think of a function as a dynamic variable, ie it gives itself a value when you have a reference to it. An example function is shown below which returns the day name from a number between one and seven. The numbers represent the days in the week of course.
function dayName (dayNumber : integer): String; begin
Notice dayName assigns itself a value. The type of value that is to be assigned to it is declared in the Function header after the parameters by going, ': ' which is in this case, string.
You should know enough about procedures and functions now so this is where this lesson ends.
Objects
C++, Java and JADE are all object oriented developement languages. This means that everything is an object which has properties and 'Methods' which are actions which the object performs.
"So what exactly is an object in Pascal?" you ask.
Well, an object in pascal is like a record with the addition of methods (procedures) which belong to that object.
An object declaration would look something like this...
type
...
thing = Object
property : type;
...
procedure nameofproc;
function nameofFunc (parameters);
end;
...
NOTE: You do not need empty parameter brackets if your procedure has no parameters.
In the body of the program your procedures/functions etc. will be called 'thing.nameofproc'. Now within the procedure you can reference the object by going 'self'. Ok here is an example procedure of an object which adds one to the objects number property.
... procedure thing.incNumber;
begin self.number := self.number + 1;
end;
...
WOW! what an amazing procedure! So all of the variables of type 'thing' will have that method at their diposal. You call the method by going [variable name here].incNumber or whatever the procedure happens to be called.
There are also special kinds of procedures called constructors and destructors. Constructors are supposed to happen when the object is created and destructors when it is deleted. But since pascal treats objects like variables these must be called on like a normal procedure. I don't see any particular need to use them, except that they may increase readability of your code.
Basic Variables in Pascal
A variable is an expression which represents a value. A variable is named such because it can have any value - its value is variable.
There are many different types of variables. For the moment we will say that a variable can store a word or a number.
eg. Number is a variable which stores a number.
Number is assigned a value of 23456.
Therefore later in the program saying:
5 * Number + 6 will be the same as saying:
5 * 23456 + 6, since Number is equal to 23456.
In Pascal, assigning variables is done by:
Number := 23456; This will make the variable, 'Number', equal to 23456.
There are several different types of number variables:
*Integer -Any Integer (Whole number) from -2^15 to 2^15 - 1
*LongInt -Any Integer (Whole number) from -2^31 to 2^31 - 1
*Real -Any Real number (Number which can have decimal points)
from 2.9 * 10^-39 to 1.7 * 10^38
(It is accurate to 11 significant figures)
Plus there are a few others, (which we won't mention yet). It isn't necessary to know all the details.
All you really need to know is that Integer variables store Integers. LongInt variable can hold much larger Integers, and Real variables can hold any number.
There are two main types of variable which hold letters:
*Char -Any single character *String -A word or phrase up to a set length
A string is a series of characters. The default maximum length of a string in Pascal is 255 characters. However if you don't want your string to be that big you should set it smaller. You do this by putting the length of the string in square brackets after the variable.
Pascal also has variable of type 'Boolean'. These can have the values of either true or false.
In Pascal, variables are declared at the beginning of the program or procedure. They must be declared after the keyword 'var'. Variables are declared in two parts. First is then name of the variable - how it will be referred to in your program. This is followed by a colon. Then is the type of variable, eg Integer, Byte. This is followed by a semicolon.
This will create the folling variables:
myInt - This will be an Integer.
aRealNumber - This is a Real number.
thisIsAString - This is a sequence of letters with a maximum length of 30 characters.
booleanVariable - This contains a true or false value.
It is interesting to note that 'string' is a keyword. This is because it is different to other variable types, as it contains a sequence or 'Array' of characters. We will study Arrays in depth in a latter lesson.
Make sure you understand all of the above before proceeding further.
Text Effects and Management
Sometimes people want to present their programs in a more entertaining way. There are some things in the Crt unit that can spice up your program and make it neater. Remember to use the Crt unit in your programs you put uses Crt; at the start of your program.
Colouring your text makes the program more attractive and pleasing to the eye. You will also be able to put borders around your text, and make headings clearer.
TextColor The way that that this works is shown below...
Textcolor (int);
Where int is an integer between 0 and 16. Pretty simple really. Here is a list of the different colors represented by int.
0 - Black 1 - Dark Blue 2 - Dark Green 3 - Dark Cyan 4 - Dark Red 5 - Purple 6 - Brown 7 - Light Grey 8 - Dark Grey 9 - Light Blue 10 - Light Green 11 - Cyan 12 - Light Red 13 - Pink 14 - Yellow 15 - White
A text effect that you might want to have in your program might be highlighting behind the text. This is done with a nifty little procedure called textBackground. Remember though, that when you use this to change the text background colour and clear the screen, it will clear it using that background colour. eg If you change it to blue and clear the screen, the whole screen will be blue. So when you clear the screen be sure to change the background color back to black (unless you want the screen to go blue)!
textBackground
textBackground (int)
int is a number between 0 and 7.
Another thing that you might want to do with your program is have a menu at the center of the screen. This means that a procedure to move the cursor to a certain point on the screen would be quite useful. Well fortunately there is such a procedure. This procedure is known as gotoXY.
gotoXY
gotoXY (x,y);
A common text screen has width 80 and height 25, so make sure you don't place the cursor off the screen. Doing this may yield unpredictable results. After you have moved the cursor to a place the next write or writeln instruction will start from there. If you do a writeln the cursor will move down a line but will not relocate itself to the same x co-ordinate as the last gotoXY.
Program Structure
The Pascal programming language has several important words in it. These are called keywords. In example programs keywords will be displayed in bold. This lesson will teach you some basic keywords and structure of your pascal programs.
It is optional to begin your program with the keyword 'Program', followed by your program name. This keyword is useful only to you. It lets you identify what the program does quickly and easily.
After this comes the keyword 'var'. This is followed by any variables you wish to use in your program. If you are not using any variables then you do not need the 'var' keyword. (More on variables in the next lesson.) Pascal will report an error if you try to use the 'var' keyword without any variables.
After this comes the keyword 'begin'. This indicates the beginning of the main part of your program. After this comes your program code. The end of the program is indicated by the keyword 'end.'. Note the full stop after the word 'end'.
It is a good idea to comment your code so you can understand what it is doing if you look at it later. It is also important so that other people can understand it also.
In pascal you can comment your code in two diffent ways. Either { to start the comment and } to end the comment or (* to start the comment and *) to end the comment.
eg.
Program DoNothing; {This line is optional}
var
begin
(*Note that comments can carry over
 multiple
 lines*)
end.
This program does absolutely and utterly nothing.
In fact this program will create an error on the begin command. It will say 'variable identifier expected'. This is because the var keyword should only be included if you have variables to declare.
There are also several other keywords, which are optional and must come before 'var'. Some of these are 'type', 'const' and 'uses'.
'Type' declares any variable structures - explained later.
'Const' declares any constant values to use throughout your program. These are anything which is always the same, such as the number of days in the week. Alternatively if you use a set value throughout your program, it is a good idea to make this a constant value so that it can easily be changed if you later decide to do so.
The 'Uses' keyword allows your program to use extra commands. These extra commands are stored together in what is called a module or library. These modules have names such as CRT, or GRAPH. Each modules contains several extra commands. These commands will be related in some way. Eg. GRAPH contains extra commands to do with graphics. CRT contains many general commands. (Even though CRT stands for Cathode Ray Tube - ie. the screen)
eg.
uses crt, graph; {This means pascal allows you to uses the extra commands in the crt and graph modules}
const
 InchesInFoot = 12; {These are some constants you might use}
 DaysInWeek = 7;
 e = 2.1718281828;
type
{Type definitions go here - don't worry about these yet}
Pada dasarnya, kaleidoskop itu terdiri dari beberapa potongan lingkaran. Nah, kita bisa membuat kaleidoskop versi digital dengan menggunakan Flash. Gampang kok.
Setting the stage.
1. Buatlah dokumen baru di Flash. File → New. 2. Default size adalah 550 x 400 px. Kita tidak perlu mengubah ukuran stage.
Membuat potongan lingkaran
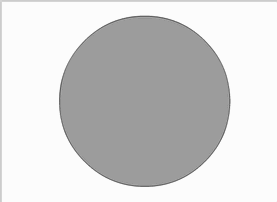
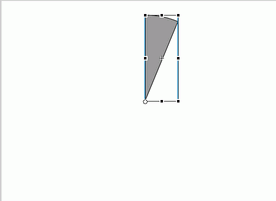
1. Buatlah sebuah lingkaran dengan menggunakan oval tool (atau O untuk shortcut).
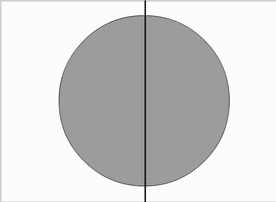
2. Buatlah sebuah garis vertikal yang membelah lingkaran yang baru kita buat menjadi dua. Lihat gambar 2.
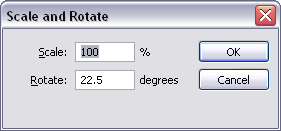
3. Pilih garis tersebut dan copy → paste in place (ctrl + shift + v) Kemudian pilih menu Modify → Transform → Scale and Rotate (ctrl + alt + s). Maka akan muncul dialog tab seperti pada gambar dibawah. Isikan kolom Rotate sebesar 22.5
Maka, hasilnya akan terlihat seperti pada gambar 3.
4. Hapuslah fill dan garis luar lingkaran tersebut sehingga membentuk potongan pizza seperti gambar 4.
5. Pilih bentuk potongan lingkaran tersebut dan convert menjadi symbol movieclip. Tekan F8 untuk memunculkan dialog convert to symbol. Namai symbol tersebut dengan nama 'potongan' dan pilih Movieclip diantara 3 pilihan yang tersedia. Ubahlah nama layer 1 menjadi 'Pecahan'.
6. Klik tool Free Transform Tool (Q). Geserlah pivot point ke bagian bawah (sudut) potongan lingkaran tersebut.
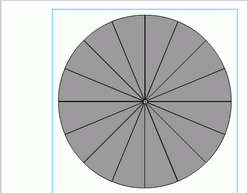
7. Copy → Paste in Place (ctrl + shift + v) potongan tersebut dan pilih menu Modify → Transform → Scale and Rotate (ctrl + alt + s). Isikan bagian Rotate sebesar 22.5 Hasilnya akan seperti gambar di bawah ini.
8. Ulangi langkah 7 sampai semua potongan membentuk formasi lingkaran seperti gambar di bawah.
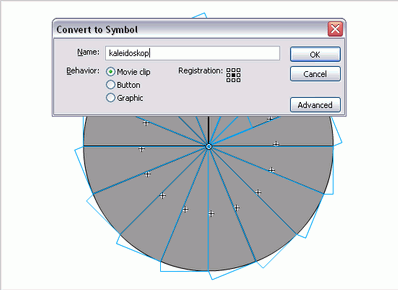
9. Klik layer Pecahan dan tekan F8 untuk memunculkan dialog convert to symbol. Beri nama 'Kaleidoskop' dan pilih Movieclip. Biarkan Registration di tengah.
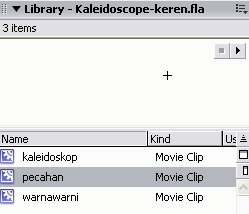
10. Pada bagian Library (Tekan L atau menu Window → Library), pilihlah movieclip Pecahan. Klik kanan pada movieclip tersebut dan pilih Edit.
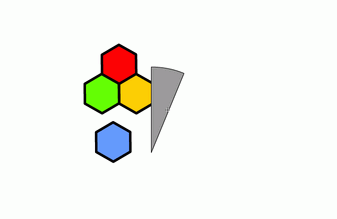
Dalam stage movieclip Pecahan, buatlah sebuah layer baru bernama 'Warnawarni' dan drag layer tersebut hingga berada dibawah layer 1. Buatlah beberapa segi enam yang berwarna warni. Pilih tool Rectangle (Klik beberapa detik) dan pilih polystar tool (shortcut R).
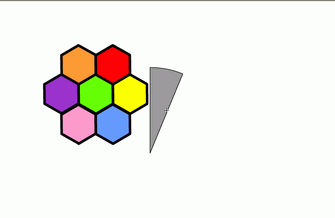
Copy paste segi enam tersebut sehingga membentuk formasi seperti yang terlihat pada gambar di bawah ini.
Pilih layer Warnawarni dan tekan F8 untuk convert formasi segi enam tersebut menjadi movieclip. Posisikan tepat di sebelah kiri bentuk potongan lingkaran.
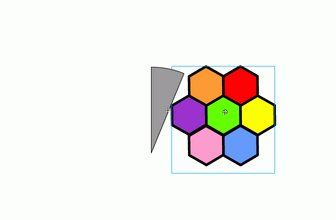
Pada layer 1, klik frame 40, dan masukan frame (Klik kanan → Insert Frame). Pada layer Warnawarni, klik frame 20. Tepat di frame 20, masukkanlah keyframe (Klik kanan → Insert Keyframe). Masih di frame 20, geserlah movieclip warnawarni tepat ke sebelah kanan potongan lingkaran (tips : sambil mendrag movieclip tsb, tekan Shift agar posisi y tidak berubah) Klik diantara frame 1 sampai 20 dan klik kanan → Create Motion Tween
Klik frame 40 pada layer Warnawarni, dan masukkan keyframe. Pada frame 40, geserlah posisi movieclip Warnawarni tepat seperti pada posisi di frame 1. Kemudian diantara frame 20 dan 40, klik kanan → Create Motion Tween. Klik tab Properties (Window → Properties), dan pada bagian Rotate, pilih CW dan kolom sebelahnya 1.
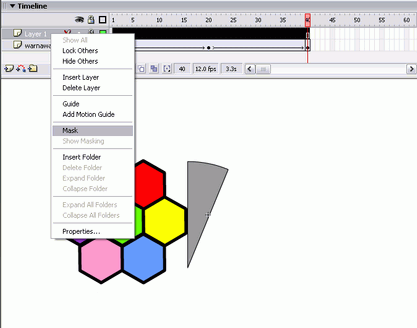
Setelah itu, pilih layer 1 dan ubah menjadi Mask dengan cara klik kanan → Mask. Play movie dengan menekan ctrl + Enter.
Anda bisa membuat variasi animasi warna kaleidoskop dengan mengubah bentuk movieclip Warnawarni dan pergerakannya (tween animation, rotation, dsb).
Selamat menikmati visualisasi kaleidoskop yang ajaib
Banyak programmer PHP yang ingin agar pembuatan web menjadi lebih cepat untuk menghemat waktu dan biaya. Berikut ini 5 tips sederhana agar web development using PHP lebih cepat.
1. Gunakan IDE atau editor yang bagus
Jika Anda masih menggunakan notepad, gantilah dengan editor lain seperti Dreamweaver, PHPEdit, de el el. Selain tampilannya yang menarik, editor seperti itu menyediakan fitur code highlighting sehingga mempermudah debugging.
2. Gunakan framework
Kebanyakan fungsi-fungsi PHP pasti melakukan hal-hal yang sama, seperti koneksi database (CRUD, Create, Read, Update, Delete). Biasanya programmer menulis ulang fungsi yang sama pada tiap proyek baru yang dikerjakan. Mengapa tidak mencoba framework? Framework seperti cakePHP, mempunyai berbagai keuntungan, seperti koneksi database yang sederhana, sampai penciptaan halaman CRUD hanya dalam beberapa langkah.
3. Framework masih kurang?
Fungsi-fungsi pada framework belum memenuhi keinginan Anda? Browsing-lah script yang telah ditulis oleh programmer lain. Tapi ingat! Carilah script yang gratis, dan under GPL license.
Atau gunakan CMS, yang notabene sudah jadi, misalnya WordPress. Walaupun Wordpress terkenal sebagai blogging tool, banyak plug-in, template hack, dan code modification yang tersedia.
Masih bingung? Carilah script di HotScript atau tanyakan ke Google.
4. Keep It Simple
Saat dalam tahap pengembangan kemudian kode yang Anda tulis terasa semakin sulit? Cobalah pendekatan lain untuk masalah yang sama. Usahakan kode yang Anda tulis dapat dengan mudah dipahami. Jika if-statement atau loop sudah lebih dari 20 baris? Cobalah untuk membaginya ke dalam beberapa blok.
Kelihatan malah membuang waktu? Sebenarnya tidak. Anda akan sangat terbantu saat membaca baris kode dan langsung bisa memahaminya.
5. Dokumentasi
Gunakanlah comment untuk memperjelas kode Anda. Fitur comment dihadirkan dengan tujuan mulia, so gunakanlah.
Hi, I'm Nerissa. I'm still newbie in blogging but i begin to love this activity. I started my blog with some articles about technology and my tasks that related too with that. I hope this blog can help you to find informations you need.